Tips For Creating a WebFarm For Your DotNetNuke site
Creating A Web farm For Your DotNetNuke Website
Author: Chad Nash/Monday, September 23, 2013/Categories: Uncategorized
Creating A Web farm For Your DotNetNuke Website
With a little luck and a lot of hard work there will come a time when your website’s popularity outgrows the capabilities of a single server. It’s time then to consider moving to a server-cluster also called web farm where you can host your website over multiple servers, balancing and shifting the load all across them so that your visitors continue getting the fast website experience that they’re used to.
Server clustering is now a part of Windows Server and IIS 7, so you can easily set up your web farm and get a dramatic boost in your website’s performance by setting up shared configuration for your website with 2 or more servers.
By using a server farm you can also avoid buying newer and costlier hardware, putting older servers to work to share the load at a lower cost. Additionally a web farm also enhances the security by creating redundancy which will keep the website online and functioning even if one of the server fails.
In this article we will learn how to set up your web server farm through IIS 7 Shared configuration feature for your DotNetNuke website.
Requirements for a DotNetNuke Web Farm
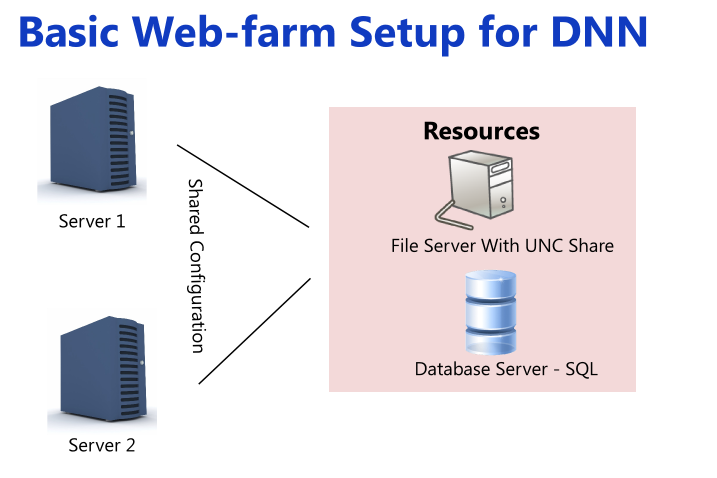
Setting up a web farm for DotNetNuke requires a setup in which there are at least two servers to handle the client requests. The servers access the files from a separate file server and the database from a special database server. The requests are routed to the servers by a special load balancer which makes sure that the requests are evenly divided between the servers.
If your application does not have major file writing operations you can also store the files locally on the two servers and remove the file server from the configuration. This server setup uses file replication to store the files across all front-end servers and any file change on one of the servers is replicated across all servers. This scheme is not suitable if your servers need a lot of file updates and changes because of the extra load that will impose.
Setting this up on IIS7 has become easier than ever thanks to the new Shared configuration feature of IIS7 which allows you to place a common configuration file that will automatically configure all the front-end server you possess.
There are two stages to setting up a web farm for DotNetNuke. You have to configure DotNetNuke to work with a web farm and you have to configure a web farm environment At the server level.
Let’s discuss the configuration of DotNetNuke first. We’ll learn how to configure IIS7 shared configuration a little while later.
Setting up DotNetNuke for Web farm
Modifying the Web.config File to Enable Web Farm Support for DotNetNuke
DotNetNuke uses the web.config to store application settings that decide how it will work. To enable the support for web-farms you have to tell DotNetNuke that it’s in a farm environment. To do this you need to enable web farm support in the Config file.
Create Common Machine Keys
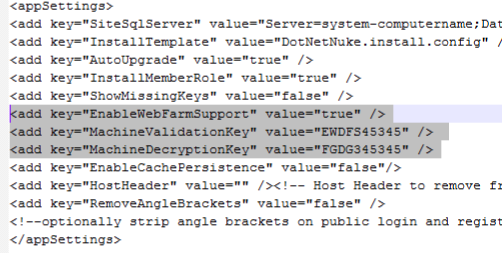
DotNetNuke requires that the machine keys of all the frontend servers in the web farm be identical. You can choose the machine keys of any server and must copy it across the servers. The machine two keys to replicate are ‘MachineValidationKey’, and ‘MachineDecryptionKey’.
The Keys are in configuration->appsettings section of the web.config file.
Enable Web Farm
Check that the EnableWebFarmSupport setting is set to ‘True’ in the Configuration->AppSettings section of the configuration file. If this setting does not exist then add it.
Add Support for DB Logging Provider
In a farm environment the logs must be kept in a database. You need to setup DotNetNuke to keep the logs in a database. To do this make sure that the value of the defaultProvider node in configuration->dotnetnuke->logging node is set to ‘DBLoggingProvider’.
Setting up the Scheduler
DotNetNuke’s scheduler which looks after the regular maintenance tasks needed to keep the website running popularly must also be configured according to the needs of the web farm. Some of the tasks must be run on each machine, while others must be run on specific ones. You’ll need to change the schedule manually.
To change the task schedule first log in as the Super User and go to the Schedule option of the Host menu. Clicking on the button ‘Run on Servers’ will bring a text-box where you can fill the server name where you want each task to run.
The tasks that you may need to modify include : DotNetNuke.Services.Scheduling.PurgeScheduleHistory, DotNetNuke.Services.Log.Eventlog.SendLogNotifications, DotNetNuke.Services.Search.SearchEngineScheduler, DotNetNuke.Modules.Admin.ResourceInstaller.InstallResources, and DotNetNuke.Services.FileSystem.SynchronizeFilesSystem.
You’ll also need to enable the task DotNetuke.Services.Cache.PurgeCache. Make sure this task is enabled and updated.
Enable File Based Caching
DotNetNuke does not support database based caching in a web farm scenario. To optimize the caching performance the caching should be file based only. Make sure the node configuration->dotnetnuke->caching has the value ‘FileBasedCachingProvider’ for the attribute ‘defaultProvider’.
Configuring IIS 7 To Work With Your Web farm
Before IIS7 setting up a web farm on IIS was a non-trivial affair because IIS offered no automated replication and configuration across all servers. From IIS7 you can create a standard configuration on one server and replicate it across all servers by sharing only some configuration files. This makes it much more easier to create a web farm for your websites.
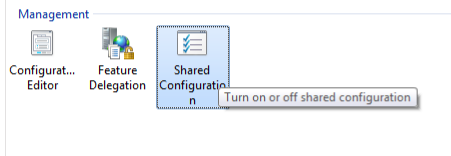
First configure your web server as usual to host the website, and when you’ve set up everything use the ‘Shared Configuration’ facility of IIS to export the server configuration files. The files should be exported to a UNC Share location which will be accessed by all the servers in the web farm for the configuration settings.
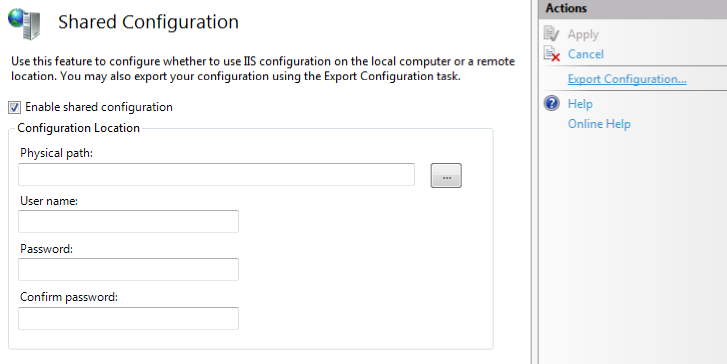
You will have to similarly enable shared configuration across all your servers and point to the same location where you have the original configuration settings saved. All the servers will copy those configuration settings.
You can easily setup the file server using the following command on the command prompt of the server which you want to use as the file server. Otherwise you can also use the windows graphical interface to set the necessary user permissions for the shared area.
md %SystemDrive%\serverconfig
net share serverconfig $=%SystemDrive%\serverconfig /grant:Users,Change
Note that we are also granting the users the right to modify the shared contents.
The UNC share will also act as a file shared server, and the servers will grab the files from the share to serve to the client requests. Make sure that you set the file server location as the Home directory of the web server to enable this. A file share is essential to a DotNetNuke web farm.
This concludes the tutorial to establish a Web farm for your DotNetNuke website. If you have made the configuration changes to both DotNetNuke and IIS then your web farm environment should be up and running. |
|
Number of views (20978)/Comments (-)
Tags:
blog comments powered by