|
The process of skinning DotNetNuke can be a very tedious process as there are numerous CSS styling elements and multiple physical style sheets that you must be aware of. This article will take you through the “default.css” file that is provided with ALL DotNetNuke installations. The most important individual classes will be discussed and screen captures will be used to show you what areas of the site these styles affect.
To get started you will want to find the default.css file, it can be found in the /Portals/_default/ folder of your DNN installation. This file is the first of the various CSS styles that are applied to a DNN site. After this file the Portal.css file is applied which allows changes for a specific portal, then finally the skin.css file is applied which allows changes for the specific skin. For a more detailed explanation regarding the order of CSS style inheritance please see the last section of this tutorial “CSS Style Application in DNN”.
In this article we will discuss making the changes at the portal level, but you may modify these settings in any of the three style sheets depending on your desired results.
SkinObject
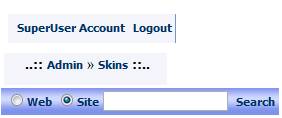
The SkinObject class is the first class that you will find defined in the default.css file. For this class you will see multiple definitions, a global definition and then definitions for each of the link types. This class is traditionally applied to anything that is included via a skin object. For example the login, register, breadcrumb, terms of use, and privacy policy links.
Below are some examples of text that is traditionally set via this class.
Head
This class is used throughout the DNN installation and applies to ALL module titles. Below is a circled location showing the application of this class.
SubHead
This class is also used throughout the DNN installation. Traditionally this is the class used for item titles as well as all instances of the DNN label control. This is a recommended class for module developers to use for headings. Below is a screen capture of this class in use within the DNN Site Settings section.
SubSubHead
This is a condensed heading that is used for module that are designed to display in a small footprint such as the DNN quicklinks module.
Normal
This class is used to render most text that is added to a DNN site. Traditionally this is the CSS class that you would set in addition to the paragraph style to change ALL general text on your site. This text is anything that appears as normal text in your website.
NormalBold
Just like the Normal class this is the class that is typically used by module developers to indicate bold text within their standard text. DNN recommends using this class rather than the standard <strong> tag to allow better skinning abilities.
NormalRed
Also just like the Normal and NormalBold classes this is the class typically used by module developers to show red text. Most commonly this will be used for error messages and other text within your portal.
NormalTextbox
This is the last of the “Normal” classes and is used to define textbox styles for input. Again this should be used by most module developers to allow for easy skinning.
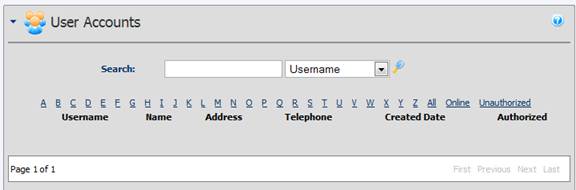
DataGrid
This class is used to style datagrids that are used on the DNN site, you fill find multiple classes listed for DataGrid to allow customization to the item, alternating item, footer, header and other sections. You can see this style in action with any of the DNN datagrids. Below is a screen capture taken from the User Accounts section of a DNN site, the grid and pager are styled using the DataGrid classes.
TreeMenu
This class is used to style the Tree Menu skin object that is used when you have a vertical menu using this object. You can set styles for each individual node and can configure the display options for each individual link type.
FileManager
These multiple CSS classes are used to style the DNN file manager for display. This is an admin item and many individuals have come to remove these sections from the default.css file and put it into an admin only skin’s CSS file to reduce file overhead.
Wizard
These classes are used to style the wizard framework within the DNN installation. This is again something that many individuals will move into an admin only skin CSS file.
Help
This is the class that is used to show the individual help text that is displayed after clicking on the ? icon next to items with the DNN Label Control. Below is an example of the help text styling (The help text is the text in the yellow box)
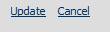
CommandButton
This is the class that is used to style buttons and link buttons within the portal admin pages. These would be the buttons for “Save”, “Cancel” and other actions. You will again for 1 main style class and then additional ones for all link types. Below is an example of the buttons as displayed with the default setup.
General classes
After the command button section of the default.css page are declarations for many of the standard HTML elements including headers, ordered lists, unordered lists, horizontal rules and other elements.
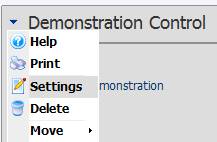
ModuleTitle
After the general class declarations you will find the Module Title Menu class declarations. These are the styles that are used to style the solpart menu that is used for the “Action” menu on each individual module. You will have classes to define the container, the menu bar, the individual items, the icons and hover actions. Below is an example of the default styled action menu
MainMenu
The next group of classes are the “MainMenu” classes which define the main site navigation menu, these classes include definitions for the menu bar, items, icons, submenu’s and selected items. You can modify these classes to customize the overall site menu layout. Below is an example of the default DNN menu with the blue skin.
LabelEdit and EIP
The final sections in the default.css file are the classes that are used for the Label Edit and Edit In Place controls. These are used to style the client-side actions when working with the label edit and edit in place controls. Typically you will NOT modify these values.
Notice Regarding Class Names
As a general notice all of the above demonstrations relate to a default DotNetNuke installation. If you are using a third party skin the applied CSS Classes might differ from those listed in this article. As part of the DotNetNuke skinning process skin designers can change the default applied CSS Classes to those that differ from the out of the box DNN styles. Depending on your specific implementation if you are using third party skins you might be able to remove unneeded styles from the default.css file that do not apply to your specific configuration.
CSS Style Application in DNN
As mentioned in the beginning of this article DNN applies at least 3 individual style sheets to each generated page, you must be aware of this and the potential effects that conflicts between these documents might cause.
The three style sheets are as follows.
Default.css – Which is discussed in this document
Portal.css – Which is maintained in “Site Settings” for your portal
Skin.css – Which is maintained as part of your portal skin
Each of these three style sheets can define the same CSS classes and each will override the previous ones settings. Therefore if you define that the Normal class should have bold font in Default.css, then define it as Italic in portal.css, and lastly define the weight as normal in skin.css you will end up with italic font for the end result. This is because the specification of normal weight in skin.css would override the default.css setting of bold. However, since you did not specify a value for italics in the skin.css file you will still have the italics from the portal.css file.
|